
NOTE: I have been updating this post on a regular basis – If you scroll to the bottom of the article, you will find I have been adding a series of videos from my Youtube channel, showing the build process of this (8′ Frugal Skiff) dinghy, step by step.
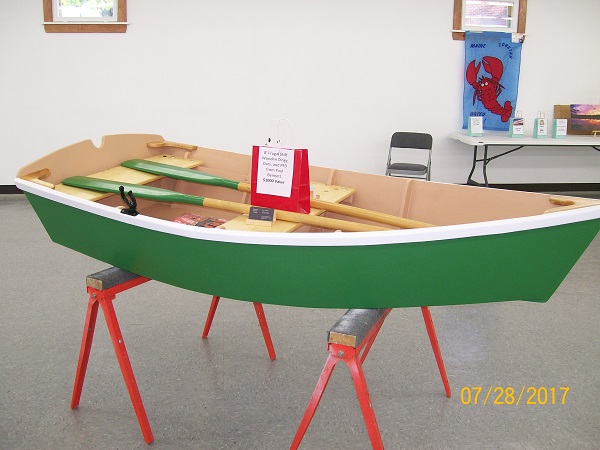
The small 8′ dinghy I built and donated for the Women’s Health Resource Library “Chinese Auction” during Milbridge Days attracted quite a few folks and sold an extraordinary number of raffle tickets. I received a lot of positive feedback and everyone loved the bright (spar varnish) finish on the quarter knees and breasthook; all fabricated from natural hackmatack knees.
Most people are not aware that I’m a retired naval architect and marine engineer. I once had an active design practice for yachts and work boats. I still maintain a hobby business out of personal interest, selling stock boat plans and instruction books I’ve written for them that are intended for novice, backyard boat builders. I market these through my other website called Shoestring Shipyard www.shoestringshipyard.com
The dinghy I built for the WHRL event is part of my “Frugal Skiff” series of designs. I no longer offer the 8′ version, but I still sell the 10′, 12′, and 14′ version – all of which go together the same way. This series used to be used for the 3 day boat building classes I once ran. Folks would begin at 0830 on a Friday morning and leave with a boat that was ready for the water (except for the paint/finish) on a Sunday afternoon around 5pm. They are that easy to build!
I shot several video segments while building this dinghy, so as soon as I have a chance, I’ll do some editing and post a series on how to build this boat on my Youtube Channel and on both of my websites (Downeast Thunder Creations and Shoestring Shipyard).
Update: Finally!!!! I have begun editing of the film clips made while building the dinghy. The first segment has been published on Youtube, and the remainder will soon follow. I’m not sure how many parts there will be yet, but I’m trying to keep each video under 5 minutes duration. Here’s the first one:(Note: There is a total of 26 segments of 5 minute average duration videos that make up the series).
This is Part 1 (of 26)
Update for 19 SEPT 2017: Here is the Part 2 (of 2) video for the boat building series:
Update for 20 SEPT 2017: Part 3 (of 26) of “Build Your Own Dinghy”:
Here’s Part 4 (of 26):
Part 5 (of 26):
Today’s Update (22 SEPT 2017) Part 6 (of 26) – This is where hull construction begins now that the major components have been fabricated:
Part 9 (of 26) goes into how to fit the chine logs to the hull.
Part 10 (of 26) of the “Build Your Own Dinghy” series of how-to videos continues with how to fit and install the chine logs to the hull.
Part 11 (of 26) continues the ongoing process of fitting and installing the chine logs to the hull, but is the final segment covering this subject.
Part 12 (of 26) begins fitting and installing the bottom panel to the hull.
Part 13 (of 26) concludes the process of fitting and installing the bottom panel to the hull.
Part 14 (of 26) covers the theory of applying fiberglass tape (definitions, why, how-to, etc.) to the plywood seams all around the bottom of the hull. An explanation is given about the materials used and how they are applied.
Part 15 (of 26) puts the theory of applying fiberglass tape into practice. It will be applied to the plywood seams all around the bottom of the hull.
Part 16 (of 26) is about fitting and installing the keel to the bottom of the hull and the installation of the false stem.
Part 17 (of 26) concludes fitting and installing the keel to the bottom of the hull and then goes over fitting and installing the skeg.
Part 18 (of 26) Filling and fairing the hull, or what I call: “The Taming of the Shmoo!”
Part 19 (of 26) The final fairing of the hull and sealing with primer.
Part 20 (of 26) Begin fitting and installing the intermediate frames.
Part 21 (of 26) Continuation of fitting and installing the intermediate frames.
Part 22 (of 26) Begins the process of fabricating, fitting, and installing the breasthook & quarter knees.
Part 23 (of 26) This video continues with the fabrication, fitting, and installation of the breasthook & quarter knees.
Part 24 (of 26) This segment conclude the addition of the breasthook and quarter knees.
Part 25 (of 26) Fitting and installing the outwales to the gunwales.
Part 26 (of 26) EPILOGUE! The final video of the series. Now it’s time for you to get out in the backyard and start making sawdust! You too, can have your own small skiff in virtually no time at all.